Secrets to Golden Seared Scallops: Pan Heat, Drying & Quality for the Perfect Scallops Recipe
Imagine a dish that epitomizes elegance, flavor, and the touch of a seasoned chef, yet is entirely achievable in your home kitchen. We're talking about perfectly seared scallops: boasting a magnificent golden-brown crust, a tender, sweet, melt-in-your-mouth interior, often nestled in a luxurious sauce. While they might appear daunting, mastering this culinary delight is less about innate talent and more about understanding a few crucial, yet simple, "secrets." This comprehensive guide will unlock the keys to restaurant-quality scallops every time, proving that the ultimate
scallops recipe is within your reach.
Too often, home cooks shy away from scallops, fearing rubbery textures or a lack of that coveted sear. But with the right knowledge—focusing on ingredient quality, meticulous preparation, and precise cooking technique—you'll be serving these delectable morsels like a pro. Whether you're planning a romantic date night dinner or simply treating yourself to an exquisite meal, these insights will elevate your scallop game from good to absolutely unforgettable.
The Unsung Heroes: Quality Ingredients & Meticulous Preparation
Before you even think about firing up the stove, the foundation of exceptional seared scallops rests firmly on the quality of your ingredients and how you prepare them. This isn't just a suggestion; it's a non-negotiable step for achieving that golden perfection.
Choosing Your Scallops Wisely
The journey to perfect seared scallops begins at the fish counter. Seek out "dry-packed" scallops if possible. "Wet-packed" scallops are often treated with sodium tripolyphosphate, which causes them to absorb water, making them heavier, less flavorful, and incredibly difficult to sear properly. They'll steam rather than brown. Dry-packed scallops, on the other hand, are natural, fresher, and will sear beautifully. Look for scallops that are firm, plump, and have a fresh, slightly sweet aroma, not fishy.
When it comes to size, medium to large sea scallops are ideal for searing, offering a substantial bite and a good surface area for crust development. Small bay scallops are better suited for quick sautés or additions to stews.
Butter, Aromatics, and Acidity: Don't Compromise
Just like any dish with a limited ingredient list, each component must shine.
- Butter: Opt for high-quality unsalted butter with a high butterfat content. Cultured butter, with its slightly tangy and richer flavor, can make a noticeable difference in your pan sauce.
- Garlic & Herbs: Fresh is best. If you have access to garden-fresh garlic and herbs like Italian parsley, cilantro, or basil, you'll taste the vitality. Supermarket fresh is still a great choice, but avoid pre-minced garlic for this dish.
- Acidity: A squeeze of fresh lemon or lime juice at the end is a game-changer. It brightens the flavors, cuts through the richness of the butter, and adds a necessary zing.
The Golden Rules of Prep: Temperature & Dryness
These two steps are absolutely critical and often overlooked:
- Bring Them to Temperature: Take your scallops out of the refrigerator about 15 minutes before cooking. This simple step takes the chill off, allowing them to cook more evenly. Cold scallops can drop the pan's temperature, hindering that crucial sear.
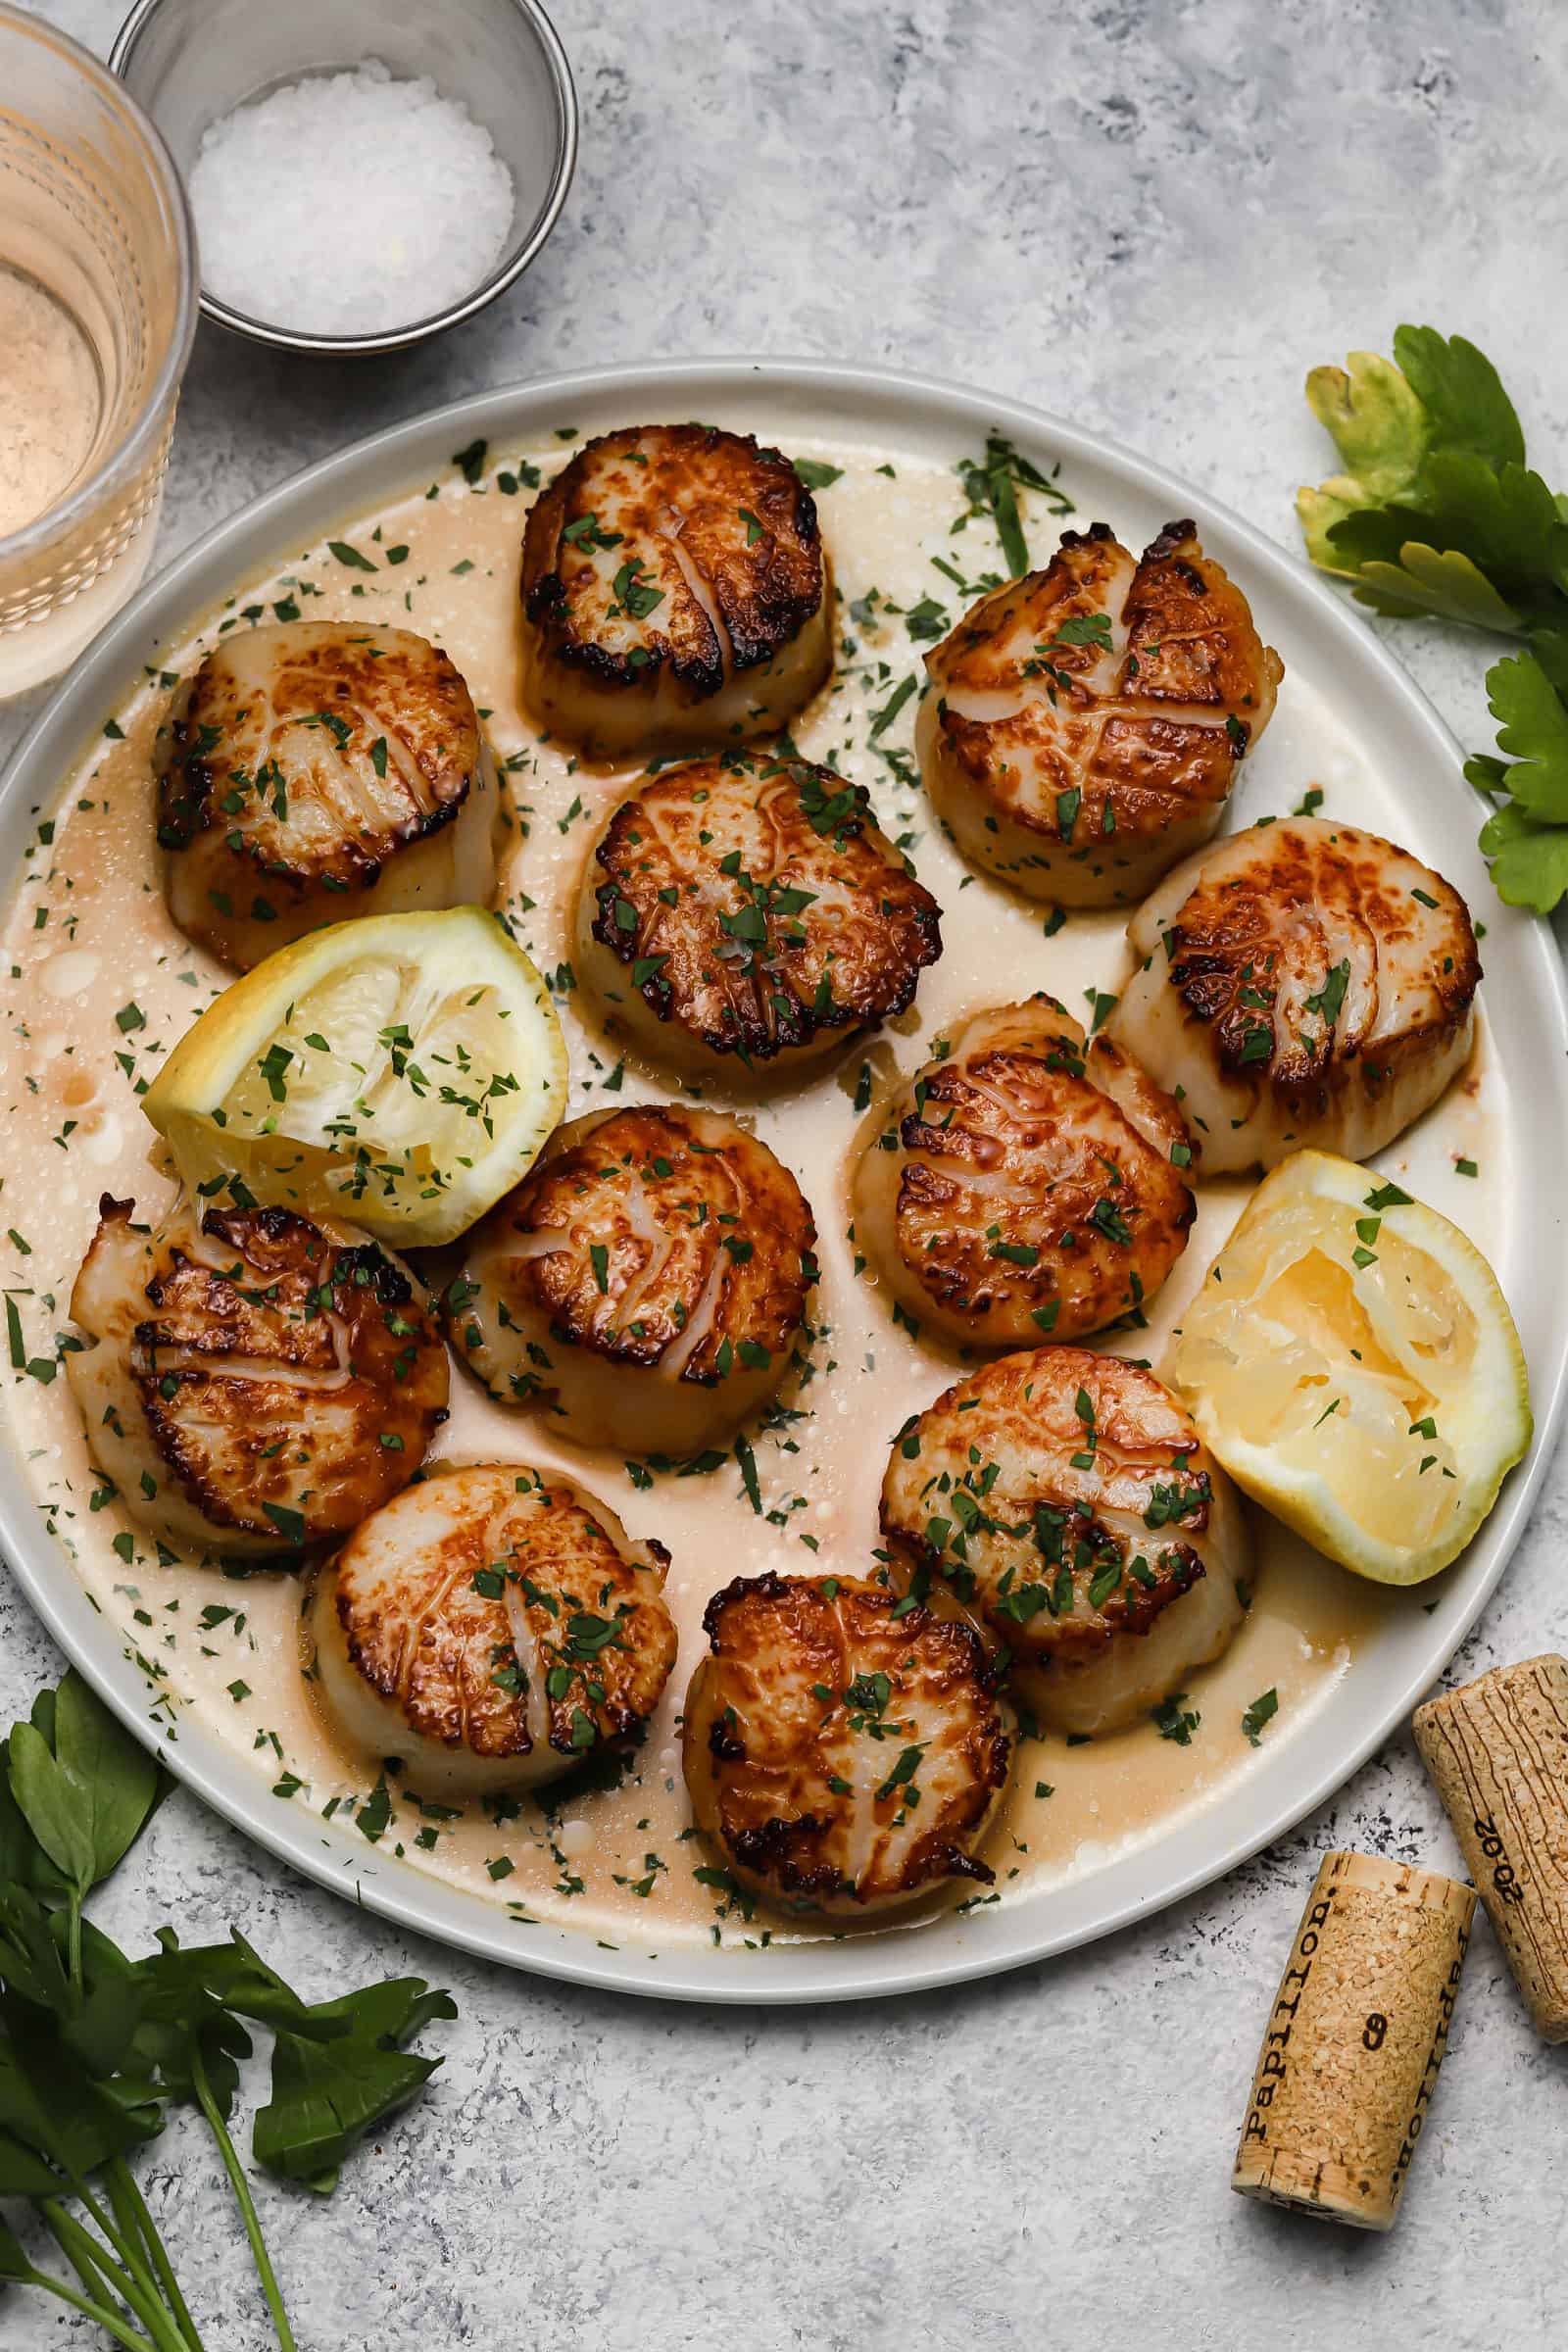
- Dry Them Thoroughly: This is arguably the most important secret. Moisture is the enemy of sear. Use several layers of kitchen paper or a clean kitchen towel to pat each scallop *completely* dry, pressing gently. Repeat if necessary. Any residual moisture on the surface will create steam, preventing the Maillard reaction (the browning that develops rich flavor and color) from occurring. A truly dry surface is the non-negotiable prerequisite for that irresistible golden crust.
Mastering the Maillard Reaction: Heat, Pan, and Technique
With your scallops perfectly prepped, it's time to create culinary magic. The goal is to achieve the Maillard reaction, a complex chemical process that transforms simple sugars and amino acids into hundreds of new flavor compounds, giving seared foods their distinctive color, aroma, and taste.
The Right Pan for the Job
Your choice of cookware significantly impacts the sear.
- Cast Iron or Stainless Steel: These are your best friends for searing scallops. They retain heat exceptionally well, ensuring a consistent, high temperature across the pan. This sustained heat is vital for achieving a dark, crusty sear.
- Avoid Non-Stick: While convenient for some dishes, non-stick pans typically struggle to reach and maintain the very high temperatures required for a proper scallop sear. They also don't facilitate the development of a flavorful fond (the browned bits at the bottom of the pan) that contributes to a delicious pan sauce. If your scallops do stick (often a sign the pan wasn't hot enough), a metal spatula on cast iron or stainless steel can easily get underneath without damage.
Heat and Oil: Turn Up the Volume!
This is where many home cooks hesitate, but don't be afraid!
- VERY Hot Pan: You need a searingly hot pan. Place your chosen pan over medium-high to high heat. Let it preheat for several minutes until it's smoking lightly.
- High Smoke Point Oil: Use an oil with a high smoke point, such as canola, grapeseed, or safflower oil. These oils can withstand intense heat without breaking down and imparting off-flavors. Add just enough to lightly coat the bottom of the pan, allowing it to shimmer and just begin to smoke before adding the scallops.
The Art of the Sear: Quick, Uncrowded, and Confident
- Space Them Out: Place the dry scallops in a single layer in the hot pan, leaving ample space between each one. Overcrowding the pan will lower its temperature, causing the scallops to steam instead of sear. Cook in batches if necessary.
- Sear, Don't Touch: Let the scallops sear undisturbed for 1.5 to 2.5 minutes, depending on their size and your desired level of doneness. Resist the urge to peek or move them! This undisturbed time is crucial for developing that beautiful golden crust.
- Flip and Finish: Once a deep golden-brown crust has formed on the bottom, use tongs to flip each scallop. Sear for another 1 to 2 minutes on the second side. Scallops cook quickly; they should be opaque throughout with a tender, translucent center. Overcooking will render them rubbery.
For more in-depth strategies to perfect this technique, consider exploring our
Master Perfect Seared Scallops: Your At-Home Pro Guide.
Crafting the Perfect Accompaniment: Sauces & Serving Suggestions
While perfectly seared scallops are a joy on their own, a complementary sauce elevates the experience, tying all the flavors together.
The Ultimate Garlic Butter Sauce (with a Twist)
The secret to a fantastic garlic butter sauce for scallops isn't to cook the scallops *in* the garlic butter. Instead, sear your scallops in a small amount of high-smoke point oil as described above. Once the scallops are removed from the pan, reduce the heat to low or medium-low. Add butter to the still-warm pan, allowing it to melt. Then, add your minced garlic, cooking it gently for about 30 seconds until fragrant—be careful not to burn it. If you have any delicious browned bits (fond) stuck to the bottom of the pan from searing, this is the perfect time to deglaze with a splash of white wine, chicken broth, or even a little water, scraping them up with a wooden spoon to enrich your sauce. This creates an incredibly flavorful base for your scallops. Toss the seared scallops back into the pan with the garlic butter sauce for a final coating, along with your fresh herbs and a squeeze of lemon or lime juice just before serving. For a truly indulgent and easy date night meal idea, our
Creamy Garlic Butter Scallops: Easy Date Night & Meal Ideas offers a fantastic recipe that perfectly complements this searing technique.
Versatile Serving Options
Seared scallops are incredibly versatile. They can be:
- A standalone appetizer: Perfect for a special occasion.
- Added to pasta: A luxurious addition to linguine or tagliatelle.
- Served in tacos or tostadas: For a gourmet twist on casual dining.
- Topped on rice bowls or salads: Elevating everyday meals.
- Even in a sandwich: For an unexpectedly delicious treat.
This technique isn't limited to scallops alone; you can apply these searing principles to shrimp, crawfish, or even firm fish chunks for equally delicious results.
Conclusion
The secrets to truly golden, melt-in-your-mouth seared scallops are now yours. It's not about complex recipes or obscure ingredients, but rather a diligent focus on quality, preparation, and technique. Remember the critical steps: choose dry-packed scallops, dry them meticulously, bring them to room temperature, use a very hot cast iron or stainless steel pan with high-smoke point oil, and sear them quickly without overcrowding. Finish with a bright, fresh garlic butter sauce, and you'll have a dish that rivals any restaurant creation. So, shed any intimidation, embrace these fundamental principles, and get ready to impress yourself and your guests with the ultimate
scallops recipe. Happy cooking!